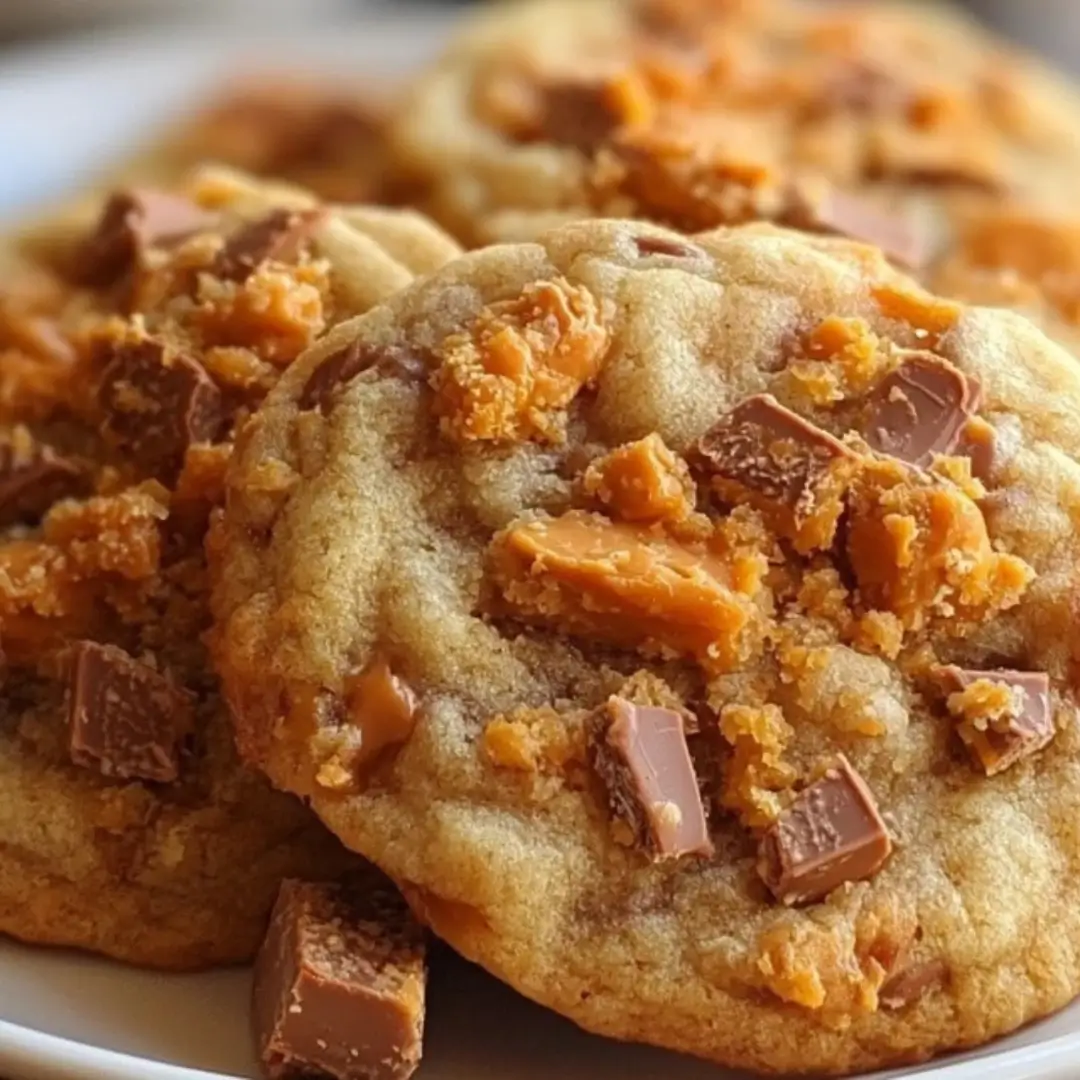
Today, I’m bringing you a cookie that is an absolute game-changer. Seriously, prepare yourself for a blissful combination of textures and flavors that are utterly addictive! These Butterfinger Caramel Crunch Cookies are soft, chewy, and loaded with pockets of gooey caramel, crunchy peanut butter candy pieces, and just the right amount of melty chocolate. They’re a sweet and salty masterpiece that’s perfect for satisfying any craving, and I promise, your friends and family are going to be asking for this recipe ASAP. If you love a classic chocolate chip cookie but crave that extra oomph, you are in the right place!
Why You’ll Love This Recipe
Trust me, you are going to fall head over heels for this recipe. Here’s why these cookies are about to become your new obsession:
- The Ultimate Texture Combo: You get a perfect mix of soft, chewy cookie dough, gooey, melty caramel bits, and the irresistible crunch of Butterfinger candy. Every bite is a party!
- Simple & Straightforward: This is a classic drop cookie recipe! It uses pantry staples and easy-to-follow steps, making it totally approachable for new bakers and weeknight baking.
- A Crowd-Pleaser: The combination of peanut butter, chocolate, and caramel is universally loved. Bring these to a potluck or party and watch them disappear in minutes.
- Perfectly Sweet and Salty: The slight saltiness in the cookie dough perfectly balances the rich sweetness of the caramel and candy, hitting all the right notes on your palate.
Ingredients
All you need for this incredible batch of Butterfinger Caramel Crunch Cookies is about 15 minutes of prep time and this stellar lineup of ingredients. Get ready for some serious cookie magic!
- All-Purpose Flour: This forms the structure and body of the cookie. Make sure to level off your scoops for the best texture!
- Baking Soda & Salt: The baking soda helps the cookies rise and spread, giving them that perfect chew, and the salt balances all the sweetness.
- Unsalted Butter: Make sure it’s properly softened (but not melted!) so it can cream beautifully with the sugars, which is the key to a tender cookie.
- Brown Sugar (packed): Adds moisture and a rich, deep molasses flavor, contributing to that soft, chewy texture we’re aiming for.1
- Granulated Sugar: Helps with spreading and crisping the edges just slightly.
- Large Egg: Our binder! It brings everything together and adds richness.
- Vanilla Extract: The secret ingredient that enhances all the other flavors—don’t skip this one!
- Caramel Bits or Soft Caramels, chopped: These little pockets of joy melt into gooey, irresistible swirls. I prefer the caramel bits, but chopping soft caramels works like a charm!
- Crushed Butterfinger Bars: The star of the show! This delivers that signature crisp, honeycomb-like crunch and salty peanut butter flavor.
- Chocolate Chips (optional): A great addition for an extra layer of classic chocolate flavor. I recommend semi-sweet or milk chocolate here.
Note: The precise measurements for these ingredients, along with the full, printable recipe, will be found right below this article in the recipe card!
How to Make the Butterfinger Caramel Crunch Cookies
Let’s get those hands dirty! Making these cookies is super simple, and before you know it, your kitchen will smell like pure bliss.
Step 1: Prep and Dry Ingredients
Start by preheating your oven to $350^\circ\text{F}$ ($175^\circ\text{C}$). Line your baking sheets with parchment paper—this is a must for easy cleanup and preventing sticking! In a medium bowl, whisk together the flour, baking soda, and salt. Set this aside for a moment.
Step 2: Cream Butter and Sugars
In your largest mixing bowl (or the bowl of a stand mixer), add the softened butter, brown sugar, and granulated sugar. Cream them together until the mixture is light, fluffy, and looks pale. This step incorporates air and is vital for a soft cookie.
Step 3: Add Wet Ingredients
Beat in the egg and the vanilla extract. Scrape down the sides of the bowl to make sure everything is perfectly combined.
Step 4: Combine Wet and Dry
Gradually add your dry ingredient mix (from Step 1) to the wet mixture. Stir just until combined. Stop mixing as soon as you no longer see streaks of flour. Overmixing develops gluten, and we want a soft, tender cookie, not a tough one!
Step 5: Fold in the Goodies
Now for the best part! Gently fold in the caramel bits, the crushed Butterfinger pieces, and the chocolate chips if you’re using them. Be gentle so you don’t crush the candy pieces too much.
Step 6: Scoop and Bake
Drop rounded tablespoons of the cookie dough onto your prepared baking sheets, making sure to leave about 2 inches of space between each one. Bake for 10-12 minutes. You want the edges to look lightly golden, but the centers should still look slightly soft and underdone.
Step 7: Cool and Savor
Allow the cookies to cool right on the baking sheet for about 5 minutes. This lets them finish cooking and set up perfectly. Then, transfer them to a wire rack to cool completely. Or, you know, just eat one (or two!) warm right off the tray—I won’t tell!
Pro Tips for Making the Recipe
Want to ensure your cookies are absolutely perfect? Follow these insider tips!
- Don’t Overbake: This is the most important rule for chewy cookies! Pull them out when the edges are set and golden, but the centers look just barely underdone. They will continue to bake on the hot pan.
- Chill the Dough (Optional): If you have time, chill the dough for 30 minutes to an hour. This helps the flavors meld and prevents the cookies from spreading too much, resulting in a thicker, chewier cookie.
- Use Room Temperature Ingredients: The butter and egg should be at true room temperature. This ensures they cream together smoothly, creating a uniform, tender dough.
- Garnish for Beauty: For that bakery-style look, reserve a few extra Butterfinger pieces and press them into the tops of the dough balls right before baking.
How to Serve
These cookies are so loaded with flavor, they are fantastic all on their own! But if you want to elevate the experience, here are a few fun ways to enjoy them:
- The Classic Pairing: Serve them warm with a tall, cold glass of milk. You can’t beat this simple combo!
- Ice Cream Sandwich: Sandwich a scoop of vanilla bean or salted caramel ice cream between two cooled cookies for an epic summer treat.
- Coffee Break: These are the perfect dunking cookie for your morning coffee or afternoon latte.
- Drizzle Time: For ultimate indulgence, drizzle cooled cookies with a little extra melted caramel sauce or chocolate ganache.
Make Ahead and Storage
Planning ahead? Here is how to keep your Butterfinger Caramel Crunch Cookies fresh and ready for when the craving hits.
Storing Leftovers
Once completely cooled, store the cookies in an airtight container at room temperature for up to 4 days. Keep a slice of plain white bread in the container to help keep them soft and fresh!
Freezing
You can freeze baked cookies for up to 3 months. Wrap them tightly in plastic wrap, then place them in a freezer-safe zip-top bag. Thaw them overnight on the counter. Even better, you can freeze the raw cookie dough balls! Scoop them, flash-freeze them on a tray, and then transfer them to a freezer bag. Bake them straight from the freezer, adding 2-4 minutes to the baking time.
Reheating
To get that warm, gooey center back, pop a cookie in the microwave for about 10-15 seconds, or warm it in a $300^\circ\text{F}$ oven for a couple of minutes.
FAQs
What kind of caramel should I use in this recipe?
You have a couple of great options here! I prefer using caramel bits (like Kraft baking caramels) as they hold their shape slightly better and create little pockets of gooeyness that don’t spread too much. However, you can absolutely use soft caramel candies (like the square kind) that are unwrapped and chopped into small pieces. Avoid using a jar of caramel sauce, as that will drastically change the texture of your dough!
Can I use a different candy bar instead of Butterfinger?
Absolutely! The beauty of a drop cookie is its versatility. Any crisp, crunchy candy bar would be fantastic here. Try chopping up Snickers, Heath bars, or even pretzels for a similar salty-crunchy effect. Just make sure the total amount of mix-ins (caramel, candy, and chips) stays about the same to keep the cookie structure sound.
Why are my cookies spreading too much and coming out flat?
There are a few common culprits for flat cookies! First, make sure your butter isn’t too warm or melted. If it’s too soft, it causes the cookies to spread too fast. Second, ensure you are properly measuring your flour (don’t pack it!). Finally, make sure your oven temperature is accurate—if it’s too low, the butter melts before the dough can set. Chilling the dough for 30 minutes can also help prevent spreading.
How should I crush the Butterfinger bars?
The easiest way to crush the bars is to unwrap them and place them in a zip-top bag. Use a rolling pin or the flat side of a meat tenderizer to lightly pound and crush them into small, irregular pieces. You want a mix of fine crumbs and small chunks for the best texture in the cookie! Avoid making them into a fine powder.
Butterfinger Caramel Crunch Cookies
Ingredients
Equipment
Method
- Preheat oven to 350°F (175°C). Line a baking sheet with parchment paper.
- In a large bowl, cream together the butter, brown sugar, and granulated sugar until light and fluffy.
- Add eggs and vanilla, mixing until combined.
- In another bowl, whisk together flour, baking soda, and salt. Gradually add dry ingredients to the wet mixture and mix until just combined.
- Fold in chopped Butterfinger bars, caramel bits, and crushed cornflakes.
- Scoop tablespoon-sized balls of dough onto the prepared baking sheet, spacing 2 inches apart. Bake for 9–11 minutes or until edges are golden brown.
- Cool on the baking sheet for 5 minutes, then transfer to a wire rack to cool completely.