This Apple Crisp Cheesecake is a true game-changer for your dessert table, combining two of the best fall treats into one stunning, creamy, and crunchy masterpiece. Picture this: a buttery graham cracker crust, a velvety smooth cheesecake filling, a layer of tender, spiced apples, and the perfect crumbly oat topping. It’s the ultimate dessert for any occasion, bringing warm, cozy flavors together with that irresistible cheesecake tang. Ready to impress your friends (and yourself!)? Let’s dive into this glorious dessert!
Why You’ll Love This Recipe
- The Perfect Mashup: Why choose between a cozy apple crisp and a decadent cheesecake when you can have both? This recipe gives you the best of both worlds in every bite—creamy, tangy, crunchy, and spiced.
- Insanely Flavorful: The secret is layering! We’re tucking those warm, caramelized apples right into the cheesecake batter, so every slice is bursting with sweet, cinnamon-y goodness.
- It’s a Showstopper: This dessert looks as good as it tastes! The baked golden crisp topping makes for a beautiful, rustic presentation that will make everyone at the table gasp (in a good way, of course!).
- Easier Than You Think: While it looks fancy, the steps are straightforward. You’ll feel like a baking pro without the fuss.
Ingredients
All you need for this heavenly Apple Crisp Cheesecake, plus a little patience while it chills! Yes, it’s that easy. But first, gather up these must-haves:
For the Crust
- Graham Cracker Crumbs: The foundational flavor and crunch! It’s the sturdy, buttery base we need for all that creamy filling.
- Brown Sugar: Adds a deep, caramelized sweetness to the crust, making it extra cozy.
- Cinnamon: A crucial warming spice that connects the crust to the apple flavors happening above.
- Melted Butter: The essential binder that turns crumbs into a perfect, pressable crust.
For the Cheesecake Filling
- Cream Cheese (softened): The star! Make sure it’s properly softened—this is the key to a lump-free, silky-smooth filling. Don’t skip this step!
- Granulated Sugar: Sweetens the cheese, balancing the tangy flavor.
- Large Eggs: They structure the cheesecake and help it set. Add them one at a time and mix just until combined to keep the texture creamy, not tough.
- Vanilla Extract: Enhances all the other flavors with a beautiful aromatic note.
- Sour Cream: Our secret weapon for that signature, slightly tangy, ultra-rich cheesecake texture.
For the Apple Layer
- Medium Apples (peeled and finely chopped): We want firm apples, like Granny Smith or Honeycrisp, that will hold their shape but soften beautifully.
- Brown Sugar & Cinnamon: To caramelize and infuse the apples with cozy, sweet-spicy flavor before they hit the filling.
- Butter: Used to sauté the apples, which makes them tender and adds a rich, depth of flavor.
For the Crisp Topping
- Rolled Oats & All-Purpose Flour: The perfect combination to create that crunchy, classic crisp texture.
- Brown Sugar & Cinnamon: Sweetens and spices the topping.
- Cold Butter (cubed): Essential for that perfect crumbly texture! We cut it in, not melt it, to ensure a beautiful crisp structure when baked.
NOTE: The full ingredients list, including all measurements, will be right under the article in the recipe card!

How to Make the Apple Crisp Cheesecake
This gorgeous dessert comes together in a few fun steps!
Step 1: Prep the Pan and Crust
Preheat your oven to $325^{\circ}\text{F}$ ($160^{\circ}\text{C}$). Get your $9$-inch springform pan ready—line the bottom with parchment paper and lightly grease the sides. Mix your graham cracker crumbs, brown sugar, cinnamon, and melted butter, then firmly press this mixture into the bottom of the pan. Bake for a quick $8$ minutes, then let it cool while you prep everything else.
Step 2: Caramelize the Apples
In a small skillet, melt the butter. Add your chopped apples, brown sugar, and cinnamon. Cook this mixture for about $5$ minutes until the apples are just tender and starting to caramelize. Set them aside—you want them to be cool or slightly warm, not hot!
Step 3: Mix the Cheesecake Filling
In a large bowl (or the bowl of a stand mixer), beat your softened cream cheese and sugar until it’s super smooth and fluffy—no lumps allowed! Beat in the eggs one at a time. Finally, mix in the vanilla extract and sour cream until your batter is totally creamy and cohesive. Remember to not overmix here!
Step 4: Assemble and Layer
Pour half of your beautiful, creamy cheesecake batter over your cooled crust. Spoon half of your tender apple mixture right over the batter. Now, gently pour the remaining cheesecake filling on top, and then evenly distribute the remaining apples over that.
Step 5: Prepare the Crisp Topping
In a separate bowl, mix the oats, flour, brown sugar, and cinnamon. Use a fork or a pastry cutter to cut in your cold, cubed butter until the mixture is crumbly—it should look like coarse sand. Sprinkle this glorious crisp topping evenly over the entire surface of the cheesecake.
Step 6: Bake and Chill
Bake for $50$–$55$ minutes, or until the edges are set and the center has just a slight jiggle. This next part is crucial for avoiding cracks: turn off the oven, crack the door open, and let the cheesecake rest inside for $1$ hour. Then, remove it and let it cool completely on the counter before moving it to the fridge to chill for at least $4$ hours (or even better, overnight!). Slice, serve, and savor!
Pro Tips for Making the Recipe
- Use Room Temp Cream Cheese: This is the single most important rule for a creamy cheesecake. If your cream cheese is cold, the batter will be lumpy, which is a total bummer!
- Don’t Overmix: Once the eggs are added, mix on low speed just until they disappear into the batter. Overmixing can incorporate too much air, which causes the cheesecake to puff up and then crack as it cools.
- The Water Bath (Optional but Recommended): For a truly silky-smooth, crack-free cake, wrap the bottom of your springform pan in foil and place it in a larger pan filled with about an inch of hot water before baking. The steam helps regulate the temperature.
- The Overnight Chill: I know it’s hard to wait, but chilling for a full $8$ hours or overnight is necessary for the cheesecake to fully set and for the flavors to deepen. It also makes for cleaner, professional-looking slices!
How to Serve
This cheesecake is divine all on its own, but sometimes you just need a little extra pizzazz!
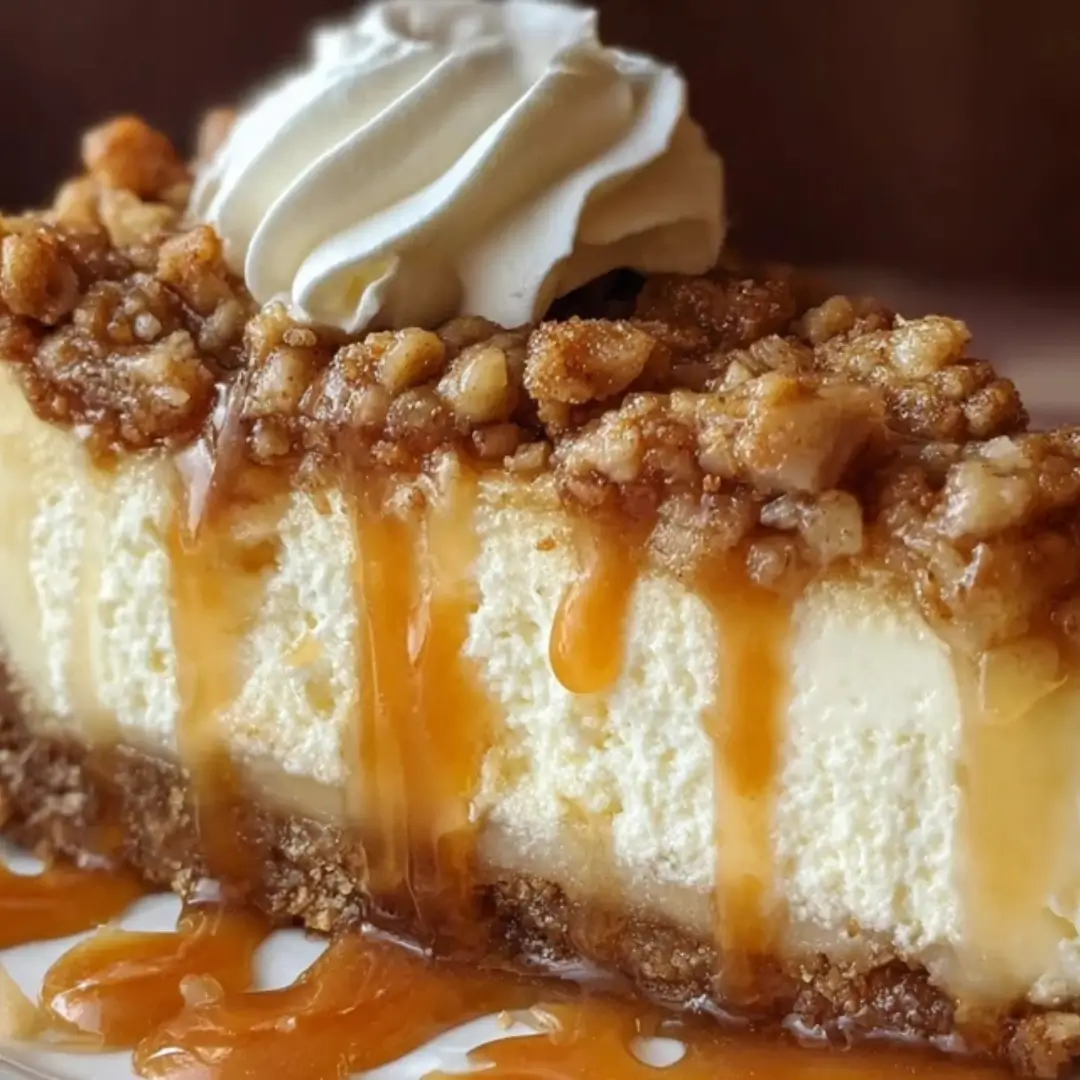
- Drizzle Time: Right before serving, warm up a little caramel sauce and drizzle it generously over each slice. It’s an obsession.
- A Scoop of Cream: Serve slices with a dollop of fresh whipped cream or a scoop of vanilla bean ice cream. The cold creaminess is amazing with the warm spices.
- Coffee Pairing: This rich, spiced dessert pairs perfectly with a strong cup of coffee, an espresso, or a cozy chai latte.
Make Ahead and Storage

Storing Leftovers
Once cooled and chilled, place any leftovers in an airtight container or cover the springform pan tightly with plastic wrap. Store in the refrigerator for up to 4 days.
Freezing
Yes, you can freeze cheesecake! Once it’s completely chilled, remove it from the springform pan and wrap it tightly in several layers of plastic wrap, followed by a layer of aluminum foil. Freeze for up to 1 month. Thaw overnight in the refrigerator.
Reheating
No need to reheat this beauty! Cheesecake is best served directly from the refrigerator, well-chilled.
FAQs
Can I use a different type of crust, like a shortbread cookie?
Absolutely! While the graham cracker crust is classic, this cheesecake would be delicious with a crushed shortbread or vanilla wafer cookie crust. Just ensure the amount of crumbs and butter is the same so the crust sets up correctly. The buttery, crisp nature of those cookies complements the creamy filling and spiced apples beautifully, offering a slightly different, but equally delicious, flavor profile.
Why did my cheesecake crack on top?
Cracking usually happens for one of two main reasons: over-mixing (which incorporates too much air) or rapid temperature changes (which causes the cheesecake to shrink too quickly). To prevent cracks, make sure your ingredients are at room temperature, don’t over-mix the batter after the eggs are added, and most importantly, follow the resting step! That slow cooling process in the turned-off oven is your best defense against those pesky cracks.
What kind of apples are best for this recipe?
You want an apple that is firm and holds its shape well during cooking, but also offers a nice balance of sweetness and tartness. Granny Smith is always a winner for its tartness, which cuts through the richness of the cheesecake. Honeycrisp, Fuji, or Gala are great choices if you prefer a sweeter apple that’s still firm. Avoid apples that turn mushy easily, like McIntosh.
Can I make the crisp topping ahead of time?
Yes, you can! The crisp topping can be prepared up to 3 days in advance and stored in the refrigerator in an airtight container. Make sure the butter stays cold. If you need a longer head start, you can freeze the topping for up to $1$ month. This is a great time-saver when you’re preparing for a big dinner or event!
Apple Crisp Cheesecake
Ingredients
Equipment
Method
- Preheat oven to 325°F (165°C). Grease a 9-inch springform pan.
- In a bowl, combine graham cracker crumbs, brown sugar, and melted butter. Press firmly into the bottom of the pan to form the crust. Set aside.
- In a large mixing bowl, beat cream cheese and sugar until smooth. Add eggs one at a time, then mix in vanilla. Pour over crust.
- Toss diced apples with brown sugar and cinnamon. Spread evenly over the cheesecake layer.
- For the crumble topping, mix oats, flour, and brown sugar in a bowl. Cut in cold butter with a fork or pastry cutter until crumbly. Sprinkle over apples.
- Bake for 55–60 minutes, or until the center is almost set. Allow to cool completely, then chill for at least 4 hours before serving.