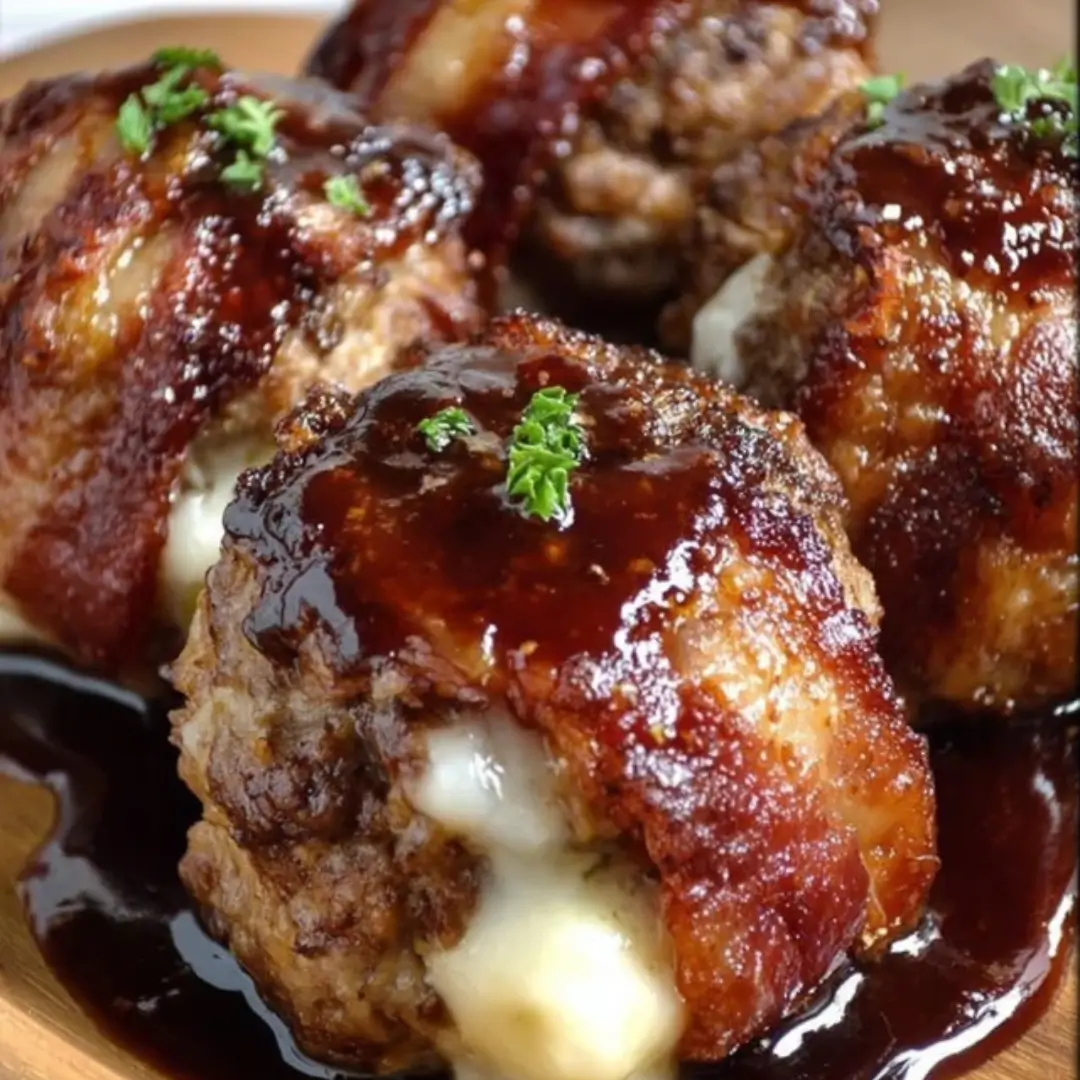
Today, I’m bringing you a true party-starter, a weeknight game-changer, and possibly the most addictive appetizer (or dinner!) you will ever make. These Cheddar-Stuffed BBQ Bacon Bombs are the ultimate bite of comfort food—a luscious, perfectly seasoned ground beef ball that gives way to a gooey center of melted sharp cheddar, all wrapped up in a blanket of crispy, smoky bacon and slathered in a tangy-sweet barbecue glaze. Trust me, these glorious little bombs are the definition of savory perfection, and your friends will beg you for the recipe. They are so easy to make, and they disappear even faster!
Why You’ll Love This Recipe
- Ultimate Comfort Food: It’s meat, it’s cheese, it’s bacon, and it’s barbecue—all the best things combined into one perfect, savory ball. It’s a true flavor explosion!
- A Crowd-Pleaser: Seriously, whether it’s a game day, a backyard cookout, or just a Tuesday night, these babies vanish fast. They are incredibly fun and dippable.
- Easy to Master: We’re keeping the steps super simple. If you can mix and roll, you can conquer this recipe. Plus, the oven does all the heavy lifting!
- That Glorious Cheese Pull: The cheddar melts into a liquid gold center, guaranteeing a wonderful surprise with every single bite.
Ingredients
All you need for these Cheddar-Stuffed BBQ Bacon Bombs, and 45 minutes of your time! Yes, it’s that easy. But first, let’s gather up these superstar ingredients:
- Ground Beef: This is our hearty base! We’re using a slightly leaner blend to ensure the bombs hold their shape, but still have enough fat for flavor and juiciness.
- Garlic Powder & Onion Powder: The foundation of all great flavors. These two provide a deep, savory aroma that makes the meat irresistible.
- Smoked Paprika: A little secret ingredient! This gives the meat a gorgeous, smoky depth that complements the bacon and barbecue sauce perfectly.
- Salt and Black Pepper: Essential seasonings to truly make the flavor of the beef pop. Don’t be shy!
- Cheddar Cheese: The bomb part of the bomb! Cut into nice, small cubes, this is the delicious, gooey center we all dream about. Use a good sharp cheddar for the best flavor.
- Bacon: The crispy, smoky hug that holds everything together. It adds incredible flavor and texture, and it’s absolutely non-negotiable here.
- Barbecue Sauce: Choose your favorite! We’re looking for a thick, tangy, and slightly sweet sauce to glaze the outside. Make sure it’s one you genuinely love, as it defines the flavor.
- Brown Sugar: This is added to the BBQ sauce to help it thicken, caramelize beautifully in the oven, and add an irresistible sticky sweetness.
- Olive Oil: Used to lightly coat the wire rack, ensuring those perfect little bombs don’t stick when they’re baking away.
- Fresh Parsley: A little pop of green at the end adds freshness and makes the dish look polished and ready for its close-up!
Note: The ingredients with precise measurements will be listed right under this article in the recipe card.
How to Make the Cheddar-Stuffed BBQ Bacon Bombs
This recipe is simple, fun, and totally foolproof. Let’s get rolling!
Step 1: Prep the Oven and the Pan
First things first, crank your oven up to 400∘F (200∘C). Grab a baking sheet and line it with foil—this saves you a huge cleaning headache later, trust me! Place a wire rack on top and give it a quick brush of olive oil to keep the bombs from sticking.
Step 2: Season the Beef Base
In a large bowl, toss in your ground beef, garlic powder, onion powder, smoked paprika, salt, and pepper. Now, gently mix it all together using your hands. The key word here is gently! We want the flavors blended, but if you overwork the meat, your bombs will turn out tough. Nobody wants a tough bomb!
Step 3: Stuff and Roll the Bombs
Divide that beautifully seasoned beef into eight equal portions. Flatten each portion into a small, palm-sized patty. Place one cube of cheddar cheese right in the center, then carefully wrap the meat around it. Make sure you seal that cheese in perfectly—we don’t want any cheesy breakouts during baking! You should have eight gorgeous, cheese-stuffed meatballs.
Step 4: Wrap and Glaze
Grab one slice of bacon for each ball and wrap it around the meatball. Tuck the ends underneath to secure it, but if you need extra support, a toothpick works great! Next, in a small bowl, whisk together the barbecue sauce and brown sugar. Brush each bacon-wrapped bomb with a light layer of this sticky, sweet glaze.
Step 5: Bake to Perfection
Place your bacon bombs on the prepared rack. Pop them in the oven and let them bake for 25–30 minutes, or until the bacon is looking crispy and the meat is cooked through. Don’t forget to brush them with a little more BBQ sauce halfway through the cook time to really lock in that flavor!
Step 6: Get That Extra Crispy Finish
If you want the bacon extra crispy and that glaze deeply caramelized, switch your oven to broil for the last 2–3 minutes. Watch these like a hawk! They can go from perfect to burnt in a heartbeat.
Step 7: Rest and Serve
Let these flavor bombs rest for about 5 minutes after they come out of the oven. This helps the juices settle and keeps the meat super tender. Finish with a sprinkle of chopped fresh parsley for a burst of color and serve them warm with extra BBQ sauce on the side for dipping. Game night officially won!
Pro Tips for Making the Recipe
- Keep the Meat Cold: Working with cold ground beef will make it much easier to shape and less likely to stick to your hands.
- The Cheese Seal is Key: Double-check that you’ve fully sealed the meat around the cheese. If you leave any gaps, that beautiful cheddar will ooze out during baking!
- Don’t Skimp on Seasoning: The beef needs to be flavorful on its own. Make sure you season generously with salt and pepper alongside the garlic powder and smoked paprika.
- Bacon Security: If you find the bacon won’t stay put, use half a wooden toothpick to secure it while baking. Just remember to remove it before serving!
How to Serve
These Cheddar-Stuffed BBQ Bacon Bombs are fantastic all on their own, but they play well with others, too!
- Dipping Delight: They are made for dipping! Serve them with extra BBQ Sauce, a side of Ranch Dressing, or even a cool Sour Cream and Chives dip.
- As a Main: Pair them with simple sides like creamy Coleslaw, a classic Potato Salad, or some buttery Corn on the Cob for a fun, casual dinner.
- As an Appetizer: Arrange them artfully on a platter with some fresh green onion sprinkled on top. They’re perfect next to chips and guacamole or a veggie tray for any party.
Make Ahead and Storage
Storing Leftovers
Place any leftover bombs in an airtight container and refrigerate them for up to 3–4 days.
Freezing
You can freeze these either cooked or uncooked!
- Uncooked: Prepare the bombs, wrap them individually in plastic wrap, then place them in a freezer-safe bag. Freeze for up to 3 months. Thaw overnight in the fridge before baking as directed.
- Cooked: Let them cool completely, then place them in a freezer-safe bag or container. Freeze for up to 3 months.
Reheating
The best way to reheat is in the oven or air fryer at 350∘F (175∘C) until they are warmed through and the bacon is crispy again (about 10–15 minutes). The microwave works, but you might lose some of that coveted crispiness!
FAQs
- Can I use a different type of cheese for the center?Absolutely! While cheddar is a classic for a reason (hello, beautiful melty factor!), you can definitely swap it out. Monterey Jack, Pepper Jack (if you like a little heat!), or even a smoked Gouda would be incredible choices. Just make sure it’s a cheese that melts well and can be cut into a firm cube.
- Can I make these on the grill instead of baking them?Yes! These BBQ bombs were practically made for the grill. Preheat your grill to medium heat. If you have a rack or a grill basket, use it to prevent sticking. Grill the bombs for about 20–25 minutes, turning occasionally, until the meat is cooked through. Brush with the BBQ glaze during the last 5 minutes of cooking.
- What’s the best way to ensure the bacon gets crispy?The wire rack is your best friend here! By elevating the bombs, hot air can circulate all the way around, ensuring the bacon on the bottom gets just as crispy as the top. Also, don’t skip that final broil step—it’s the quickest way to get a perfectly caramelized, crispy finish.
- How can I make the meat mixture spicier?If you want to turn up the heat, it’s super easy! Add 1/2 to 1 teaspoon of Chili Powder or a pinch of Cayenne Pepper to the ground beef mixture. You could also use a spicy BBQ sauce for the glaze, or even stuff the center with a thin slice of jalapeño alongside the cheese!
Cheddar-Stuffed BBQ Bacon Bombs
Ingredients
Equipment
Method
- Preheat the oven to 400°F (200°C). Line a baking sheet with foil and place a wire rack on top.
- In a mixing bowl combine the ground beef, smoked paprika, garlic powder, onion powder, salt and pepper. Mix gently until just combined — avoid overworking.
- Divide the meat into 6 equal portions (about 3 oz / 85 g each). Flatten each portion into a 3″–4″ disc in your palm.
- Place a cheddar cube in the center of each disc, fold the meat around the cheese and roll into a tight ball, sealing seams so cheese won’t leak.
- Lay two overlapping bacon slices per bomb in a cross or X shape. Place the meat ball on top and wrap bacon around, securing ends underneath with a toothpick if needed. Repeat for all bombs.
- Whisk together 1/4 cup BBQ sauce and the brown sugar. Brush each bacon-wrapped bomb with half the mixture, reserving the rest for later.
- Optional — chill the formed bombs on the rack for 15 minutes to help bacon set (this makes handling easier and reduces bacon shrinkage).
- Bake on the middle rack for 20–25 minutes, until bacon is crisped to your liking and internal temperature of the meat reaches 160°F (71°C). Brush once more with remaining BBQ sauce during the last 5 minutes.
- Remove from oven and let rest 5 minutes. Remove toothpicks, garnish with chopped chives if desired, and serve warm.