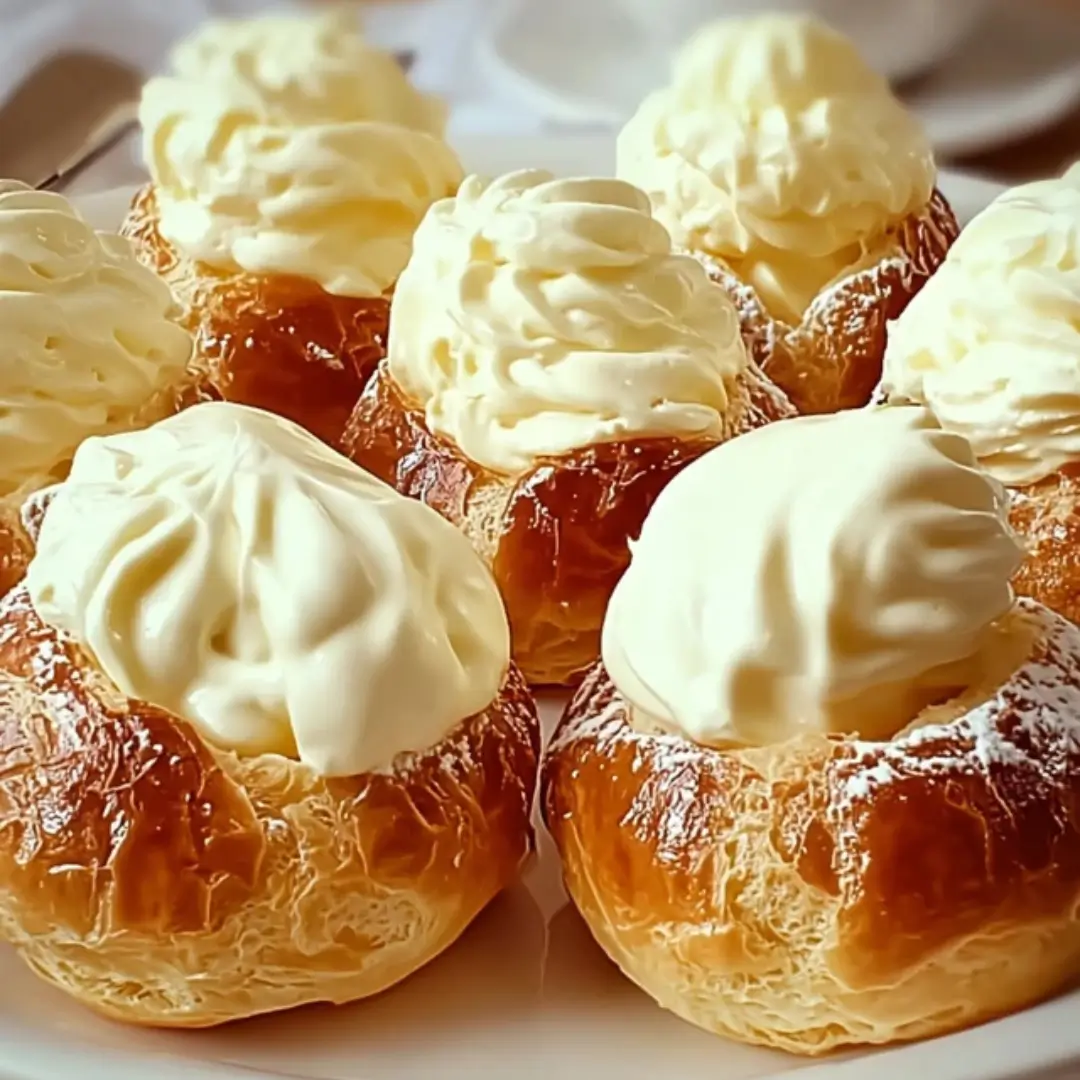
Today I’m bringing you a truly ethereal treat—the Classic Cream Puff. Trust me, this one is a game-changer and a beautiful example of how simple ingredients can transform into something utterly sophisticated and delicious. This recipe takes the light, airy French pastry, called pâte à choux, and pairs it with a cloud of sweetened vanilla whipped cream and a luscious chocolate drizzle. It feels fancy, but it’s surprisingly easy to master, resulting in hollow, golden shells just begging to be filled. If you’re looking for that perfect bite of delicate pastry, creamy filling, and rich chocolate, then get ready to bake, because this one will make your kitchen feel like the best little French patisserie.
Why You’ll Love This Recipe
- Puff Perfection: The secret is the pâte à choux dough, which creates an airy, hollow shell that is just begging to be filled with cream. They are light, delicate, and melt in your mouth!
- A Showstopper Dessert: These beautiful puffs look impressive, making them perfect for entertaining, holidays, or simply treating yourself to a delightful homemade pastry.
- Simple & Classic Flavors: You can’t beat the pairing of a rich, airy pastry with a fluffy vanilla whipped cream and a decadent chocolate ganache. It’s a timeless combination everyone adores.
- A Fun Baking Challenge: If you’ve never made pâte à choux before, this is an encouraging and rewarding recipe to try! It’s easier than you think, and the result is UNREAL.
Ingredients
Making these light and beautiful Cream Puffs requires just a handful of everyday ingredients. It’s a magic trick of simple components coming together!
- Water: This is the liquid base that steams the batter, helping to create that perfect hollow center in the pastry.
- Unsalted Butter: Adds richness and flavor to the pastry dough. Using unsalted allows you to control the overall saltiness.
- Granulated Sugar & Salt: The sugar offers a tiny hint of sweetness, and the salt balances the richness and enhances the overall flavor profile. Don’t skip the salt!
- All-Purpose Flour: This is the structure! It’s added all at once to a boiling mixture to create what’s known as the panade—the start of our beautiful pâte à choux.
- Large Eggs: The key ingredient! Eggs give the dough lift and elasticity, allowing the puffs to “puff” up dramatically in the oven. You need a smooth, glossy dough!
- Heavy Whipping Cream: The foundation of our dreamy filling. Make sure it’s cold for the best, stiffest peaks!
- Powdered Sugar: Used to sweeten the whipped cream. It dissolves instantly, giving the cream a smooth texture.
- Vanilla Extract: A splash of pure vanilla adds warmth and depth to the simple, beautiful whipped cream.
- Semi-Sweet Chocolate Chips & Heavy Cream (for topping): These two are melted together to create a simple, luscious chocolate glaze (ganache) perfect for drizzling.
Please note: The full list of ingredients with specific measurements is available in the complete recipe card found right under this article!
How to Make the Classic Cream Puffs
Follow these steps, and you’ll be on your way to a perfect batch of pillowy cream puffs!
Step 1: Prep the Oven and Pan
Preheat your oven to a hot 400∘F (200∘C). This high heat is essential for a good puff! Line a baking sheet with parchment paper to prevent sticking.
Step 2: Make the Dough Base
In a medium saucepan, combine the water, butter, sugar, and salt. Bring this mixture to a rolling boil over medium heat. When it’s bubbling, remove the pan from the heat immediately.
Step 3: Mix in the Flour (The Panade)
Add all the flour in one quick dump and stir vigorously with a wooden spoon. Keep stirring until the dough pulls away cleanly from the sides of the pan and forms a neat ball. This cooks the flour and is crucial for a stable dough.
Step 4: Cool and Add the Eggs
Let the dough cool off for about 5 minutes—we don’t want to scramble those eggs! Then, add the eggs one at a time, beating well after each addition. The mixture will look messy at first, but keep beating until the dough is silky smooth and glossy. You’re looking for that perfect consistency that slowly falls from a spoon.
Step 5: Pipe the Puffs
Transfer the glossy dough to a piping bag fitted with a large round tip (or simply use a sturdy freezer bag with the corner snipped). Pipe small, neat mounds, about 2 inches wide, onto the prepared baking sheet. Remember to leave space between them for maximum puff!
Step 6: Bake the Pastry
Bake for 20–25 minutes. A word of caution: Do not open the oven door during this time! The steam inside is what makes the puffs rise and hollow out. When they are beautifully golden brown and look perfectly puffed, remove them and let them cool completely—this is important!
Step 7: Whip the Cream Filling
While the puffs cool, make the magic filling! In a clean bowl, beat the cold heavy cream, powdered sugar, and vanilla until stiff, fluffy peaks form.
Step 8: Fill and Drizzle
Slice each cooled puff in half horizontally. Spoon a generous dollop of that gorgeous whipped cream inside and replace the top. Now for the chocolate! Melt the chocolate chips and heavy cream together until smooth, then drizzle it casually and artfully over the tops of your filled cream puffs.
Step 9: Chill and Serve
Place your stunning creation in the refrigerator to chill for 20 minutes. This sets the chocolate and firms up the cream, ready for serving!
Pro Tips for Making the Recipe
- Don’t Rush the Dough: When you add the eggs, the dough needs to be cool enough that it won’t cook them. The final dough should be smooth and sticky. If you run a wooden spoon through it, the channel should slowly come back together.
- Keep the Oven Door Closed: I can’t stress this enough! Opening the oven will drop the internal temperature, which causes the pastry to deflate, and you’ll end up with flat puffs.
- Use Cold Cream: Make sure your heavy whipping cream is straight from the fridge and your bowl is cold (if possible) when making the filling. This ensures the best volume and stiffest, most stable whipped cream.
How to Serve
These little beauties are perfect on their own, but here are a few fun ways to present them:
- Dusted Delight: For a simple but elegant look, skip the chocolate drizzle and just dust the finished, filled puffs with a little extra powdered sugar.
- Fruit Pairing: Serve them alongside fresh seasonal berries (strawberries or raspberries are divine) for a pop of color and freshness.
- Holiday Dessert Board: Arrange them on a large platter with other small desserts like mini brownies, macarons, and dipped strawberries for a stunning spread.
Make Ahead and Storage
Storing Leftovers
Unfilled cream puff shells can be stored in an airtight container at room temperature for up to 2 days, or frozen (see below). Once filled, the cream puffs must be stored in an airtight container in the refrigerator and are best enjoyed within 1-2 days before the shells start to soften.
Freezing
The unfilled shells freeze beautifully! Place cooled, baked shells in a single layer on a baking sheet and freeze until solid. Transfer them to a freezer-safe bag for up to 3 months. Thaw at room temperature and refresh them in a 350∘F (175∘C) oven for about 5-10 minutes before filling. I do not recommend freezing them once they are filled.
Reheating
If you froze the shells, they can be reheated (refreshed) in a 350∘F (175∘C) oven for about 5-10 minutes to crisp them back up before cooling and filling.
FAQs
1. What if my pastry dough isn’t rising in the oven?
This is usually a result of not cooking the flour mixture long enough on the stovetop, which is crucial for drying out the dough, or opening the oven door too soon. Make sure you stir the flour vigorously until a film forms on the bottom of the pan to ensure proper structure. Also, make absolutely sure your oven is preheated to the high temperature needed, as the initial blast of heat is what creates the steam that puffs up the dough.
2. Can I make this with different fillings?
Absolutely! The beauty of the simple pâte à choux shell is its versatility. Instead of simple whipped cream, you could fill them with pastry cream (crème pâtissière), ice cream for a summer treat, or even a savory filling like chicken salad for a unique appetizer. The possibilities are truly endless, so feel free to experiment with your favorite flavors!
3. Why do I need to add the eggs one at a time?
Adding the eggs slowly allows the dough (the panade) to fully incorporate each one before adding the next. This gives you better control over the final texture. The dough can only absorb a certain amount of liquid, and adding the eggs one by one helps you ensure the dough reaches that perfect, glossy, dropping consistency without becoming too runny, which would result in flat puffs.
4. Can I prepare the cream puffs ahead of time?
Yes, but only partially. The best way to prep is to bake the shells 1-2 days in advance and store them unfilled at room temperature or freeze them. You can also make the chocolate drizzle ahead of time and store it in the fridge. However, for the best texture, only fill the cream puffs with whipped cream an hour or two before you plan to serve them, as the cream will start to soften the delicate pastry over time.
Classic Cream Puffs
Ingredients
Equipment
Method
- Preheat oven to 400°F (200°C). Line a baking sheet with parchment paper.
- In a saucepan, combine butter, water, and salt. Bring to a boil.
- Reduce heat, add flour all at once, and stir vigorously until mixture forms a ball and pulls away from sides of pan.
- Transfer dough to a mixing bowl. Beat in eggs one at a time until smooth and glossy.
- Pipe or spoon dough onto prepared baking sheet in 12 mounds. Bake for 25–30 minutes until golden brown. Cool completely.
- For filling, whip cream with powdered sugar and vanilla until stiff peaks form.
- Slice cooled puffs in half and fill with whipped cream. Replace tops and dust with powdered sugar if desired.