If you’re ready for a dessert that is pure, joyful nostalgia mixed with the sophisticated comfort of cheesecake, then stop right here. This Rice Krispie Treat Cheesecake is truly luscious! It’s the ultimate no-bake, sweet, and creamy dream that brings two childhood favorites together into one seriously spectacular package. Trust me, the crunchy, chewy crust meeting that light, airy filling is a textural game-changer. It’s simple to make, ridiculously fun, and guaranteed to be the star of any gathering. You’re going to love this one!
Why You’ll Love This Recipe
- Ultimate Nostalgia Bomb: It takes you straight back to childhood with that classic Rice Krispie treat flavor, but elevates it with a dreamy, creamy cheesecake filling.
- No-Bake Wonder: Skip the oven! This dessert requires zero cooking time, making it perfect for hot summer days or when you just don’t feel like heating up the kitchen.
- Crowd-Pleaser: Whether you’re making it for a birthday party, a holiday, or just a Tuesday night, the unique and fun combination always earns rave reviews.
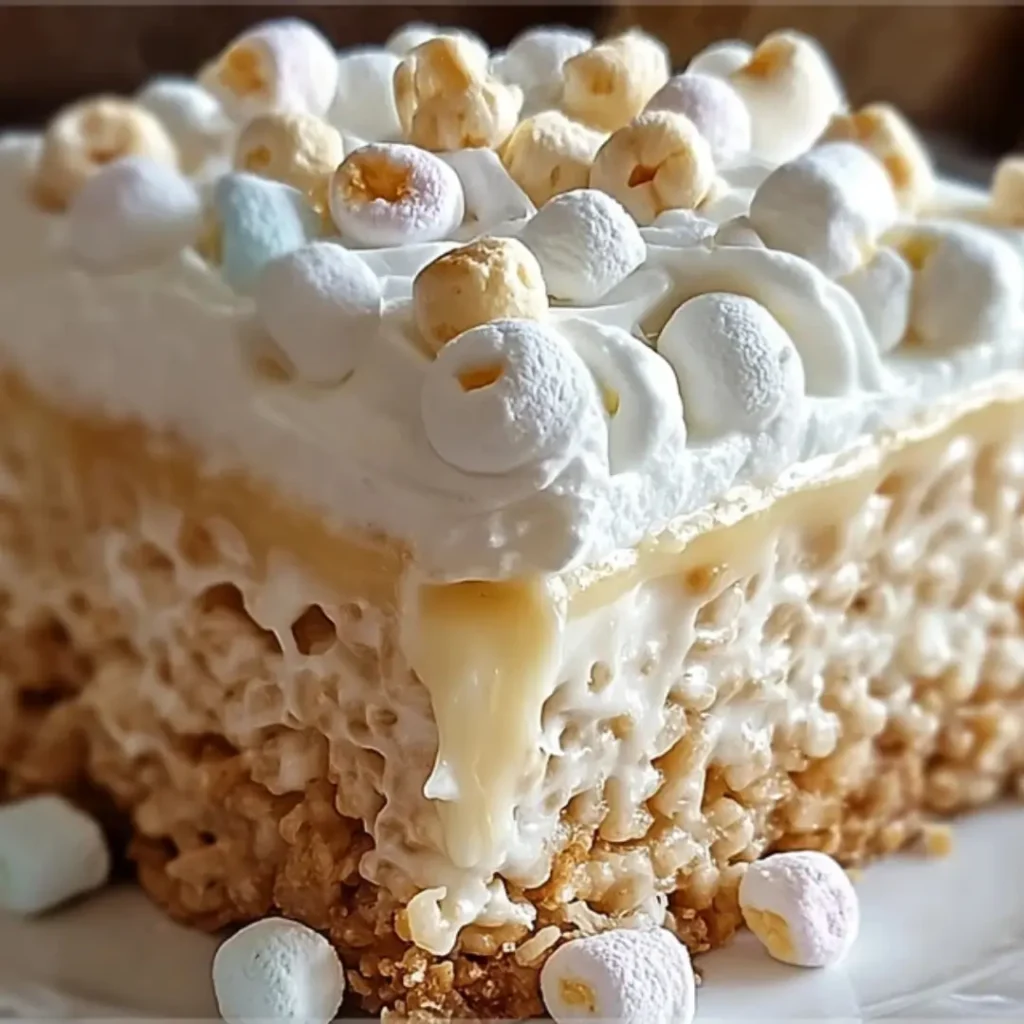
- A Game-Changer Crust: Instead of a traditional graham cracker base, you get a chewy, crunchy, buttery crust that you can mold right up the sides!
Ingredients
All you need for this incredible Rice Krispie Treat Cheesecake are a few simple things, and about 15 minutes of hands-on time! Yes, it really is that easy. But first, gather up these essential ingredients:
- Crisp Rice Cereal: The foundation of our spectacular crust! We need plenty to get that perfect crunch and chewiness that makes the base so addictive.
- Salted Butter: This adds richness and helps bind our crust together. I love using salted butter here because that tiny bit of savory salt cuts the sweetness just right.
- Mini Marshmallows: These are the key to the sticky, gooey perfection of the crust. They melt beautifully with the butter to create that classic Rice Krispie binder.
- Cream Cheese: Make sure it’s properly softened! This gives the cheesecake filling its rich, tangy, and creamy structure. It’s the “cheesecake” part, after all!
- Granulated Sugar: Just a touch to sweeten the cream cheese base and balance the flavors.
- Vanilla Extract: A splash of pure vanilla brightens the entire filling and complements the marshmallow perfectly. Don’t skip it!
- Marshmallow Creme/Fluff: This is where the magic happens in the filling! It keeps the mixture incredibly light, fluffy, and gives it that irresistible marshmallowy sweetness without being dense.
- Whipped Topping (like Cool Whip): This is the secret to an airy, no-bake filling. You must fold it in gently to keep that light, cloud-like texture!
- Whipped Cream and Extra Treats: Totally optional, but adding a little extra flourish (like a piped border or a few mini treats on top) makes it look professionally delicious.
Note: The exact measurements and quantities for all these ingredients can be found right below the article in the handy recipe card!
How to Make the Rice Krispie Treat Cheesecake
This recipe is completely no-fuss. You don’t even need an oven! Just follow these easy steps and prepare for a dessert masterpiece.
Step 1: Prep the Pan and Melt the Gooey Stuff
First things first, grab your 9- or 10-inch springform pan and give it a good grease. This makes serving so much easier. Now, in a medium saucepan over low heat, gently melt your butter and mini marshmallows together. Stir continuously until the mixture is completely smooth and glossy—patience is key here!
Step 2: Form the Famous Crust
Remove the marshmallow mixture from the heat and immediately stir in the crisp rice cereal until every piece is fully coated in that glorious, sticky goodness. Now, press this mixture firmly into the bottom and up the sides of your prepared pan. Use the back of a measuring cup or a rubber spatula to really pack it in there. Let it chill and set for about 20 minutes while you make the filling.
Step 3: Whip the Cream Cheese Base
While the crust is setting, grab a large mixing bowl and your hand mixer. Beat the softened cream cheese, sugar, and vanilla extract until it’s perfectly smooth and free of any lumps. Next, add that marshmallow creme/fluff and keep beating until it is fully blended into the creamy base.
Step 4: Fold in the Fluff
Now for the delicate part! Take your thawed whipped topping and gently fold it into the cream cheese mixture by hand. Use a large spatula and cut down the center, sweeping up the sides. We want to keep all that beautiful air in the whipped topping, so be gentle! Stop folding as soon as it is just combined—no overmixing allowed!
Step 5: Fill, Chill, and Wait (The Hardest Part)
Spread your light, airy cheesecake filling evenly into the prepared Rice Krispie treat crust, smoothing the top with your spatula. Now comes the hard part: waiting! Pop the cheesecake into the refrigerator for at least 2 hours (or until it’s perfectly firm).
Step 6: Garnish and Serve!
Once chilled, unclip the springform pan and slide the ring off. If you’re feeling fancy (and you should!), garnish the top with piped whipped cream and those cute extra mini rice-crispy treat pieces. Slice and prepare for pure delight!
Pro Tips for Making the Recipe
- Soften the Cream Cheese: This is non-negotiable! If your cream cheese isn’t fully softened, your filling will be lumpy, and we want silky smooth goodness.
- Use Low Heat for Melting: When melting the butter and marshmallows, use the lowest heat setting possible. High heat can make the marshmallows hard and brittle when they cool, ruining that perfect chewy crust texture.
- Don’t Over-Mix the Whipped Topping: Remember, we are aiming for airy! Over-mixing after you add the whipped topping will deflate it, and your cheesecake will be dense instead of fluffy. Fold gently!
- Chill Time is Essential: Two hours is the absolute minimum. If you can make this dessert a day ahead, it will set up even better and slice beautifully!
How to Serve
This cheesecake is fantastic all on its own, but here are a few ways to take it totally over the top!
- The Classic Way: Top each slice with a generous dollop of fresh whipped cream and a sprinkle of mini marshmallows or chopped treat pieces.
- Sauce Drizzle: Drizzle warm chocolate sauce, caramel, or even a raspberry coulis over the top right before serving for a little extra elegance.
- Ice Cream Dream: Serve a small slice alongside a scoop of vanilla bean ice cream—the cold creamy contrast is unbelievable.
- Coffee Pairing: This ultra-sweet treat pairs wonderfully with a strong cup of black coffee or an espresso to cut through the richness.
Make Ahead and Storage
This dessert is a fabulous one to make in advance, so plan ahead to keep your party stress-free!
Storing Leftovers
Any leftover cheesecake can be stored tightly covered in an airtight container in the refrigerator for up to 4 days.
Freezing
While possible, freezing can sometimes change the texture of the no-bake filling, making it slightly watery upon thawing. If you must freeze, place the whole cheesecake (without garnish) in a freezer-safe container for up to 1 month.
Reheating
This is a no-bake, no-reheat dessert! Always serve this cheesecake directly from the refrigerator when it is cold and firm.
FAQs
1. Can I use homemade whipped cream instead of store-bought whipped topping?
You absolutely can use homemade whipped cream, but be aware it might not hold its structure quite as long as the stabilized store-bought variety. If you go the homemade route, make sure you whip the cream until it forms stiff peaks, and try to serve the cheesecake within 24 hours to maintain the best, fluffiest texture. This filling relies on a stable base to stay light and firm, so a good quality whipped topping makes the process much more reliable!
2. Why did my Rice Krispie crust turn out too hard?
A crust that is too hard is usually a sign that the marshmallows were cooked at too high of a heat or for too long. When marshmallows are exposed to high heat, the sugars can crystallize, making them brittle when cooled. Make sure to melt the butter and marshmallows over very low heat, stirring constantly, and remove them from the burner the second they become smooth and pourable.
3. Can I make this in a standard pie dish instead of a springform pan?
Yes, you can definitely use a standard 9-inch pie dish, but you won’t get that beautiful tall presentation, and slicing might be a little trickier! The springform pan makes it incredibly easy to release the finished, firm cheesecake cleanly, showing off the crust and the filling perfectly. If you use a pie dish, just make sure you press the crust firmly into the bottom and sides, and use a serving spatula to dig out the slices.
4. How can I make this dessert even more chocolatey?
There are a few easy ways to boost the chocolate flavor! You could drizzle a generous amount of chocolate syrup over the filling before you chill it for a beautiful marble effect. Alternatively, you could fold in about 1/4 cup of mini chocolate chips into the cream cheese filling along with the whipped topping—just remember to fold gently to keep it airy!

Rice Krispie Treat Cheesecake
Ingredients
Equipment
Method
- In a saucepan, melt the butter over low heat. Add marshmallows and stir until fully melted and smooth.
- Remove from heat and stir in Rice Krispies cereal until evenly coated.
- Press the mixture firmly into the bottom of a greased 9-inch springform pan to form the crust. Set aside to cool.
- In a large bowl, beat the cream cheese, sugar, and vanilla until smooth.
- In a separate bowl, whip the heavy cream until stiff peaks form. Gently fold the whipped cream into the cream cheese mixture until well combined.
- Spread the cheesecake filling evenly over the Rice Krispie crust. Smooth the top.
- Refrigerate for at least 2–3 hours, or until firm.
- Top with mini marshmallows and extra Rice Krispies before serving. Slice and enjoy!