If there is one treat that truly captures the magic and simplicity of the holidays, it has to be fudge. And today, I’m bringing you a version so festive, so creamy, and so unbelievably easy, it’s going to be your new go-to for all those holiday cookie exchanges and cozy nights in. This Christmas Fudge is a dreamy, melt-in-your-mouth delight, loaded with white chocolate goodness, vanilla warmth, and the perfect crunch of festive sprinkles. Trust me, you are going to absolutely love how quickly this comes together!
Why You’ll Love This Recipe
- Super Simple, No-Bake Magic: Seriously, if you can melt chocolate on the stovetop, you can make this! No candy thermometers or tricky steps here—this recipe is a true game-changer for stress-free holiday baking.
- Insanely Creamy Texture: Thanks to the genius combination of white chocolate chips and sweetened condensed milk, this fudge is wonderfully smooth and silky without any heavy cream needed.
- Highly Customizable: While we’re dressing it up for the holidays with those beautiful red and green sprinkles, you can easily swap in different nuts, candies, or extracts to make it perfect for any time of year.
- The Perfect Holiday Gift: Who doesn’t love receiving a handmade treat? Wrap these little squares up in a cute box, and you’ve got the most thoughtful and delicious gift around!
Ingredients
All you need for this magical Christmas Fudge are a few simple ingredients and about 10 minutes of time over the stove. Yes, it really is that easy! But first, gather up these necessities:
- White Chocolate Chips: This is the creamy, luscious base of our fudge! They melt down beautifully and provide that distinct sweet, vanilla flavor.
- Sweetened Condensed Milk: This ingredient is key! It not only provides sweetness but, when melted with the chocolate, gives the fudge its signature, perfectly dense, and smooth texture.
- Pure Vanilla Extract: A little splash of vanilla elevates all the other flavors and adds that classic “baked good” aroma.
- Salt: Just a tiny pinch! Salt is crucial for balancing the sweetness and making that rich chocolate flavor really pop.
- Mini Marshmallows (Optional): Gently folding these in adds little pockets of gooey, airy fluffiness and gives the fudge a wonderful chew.
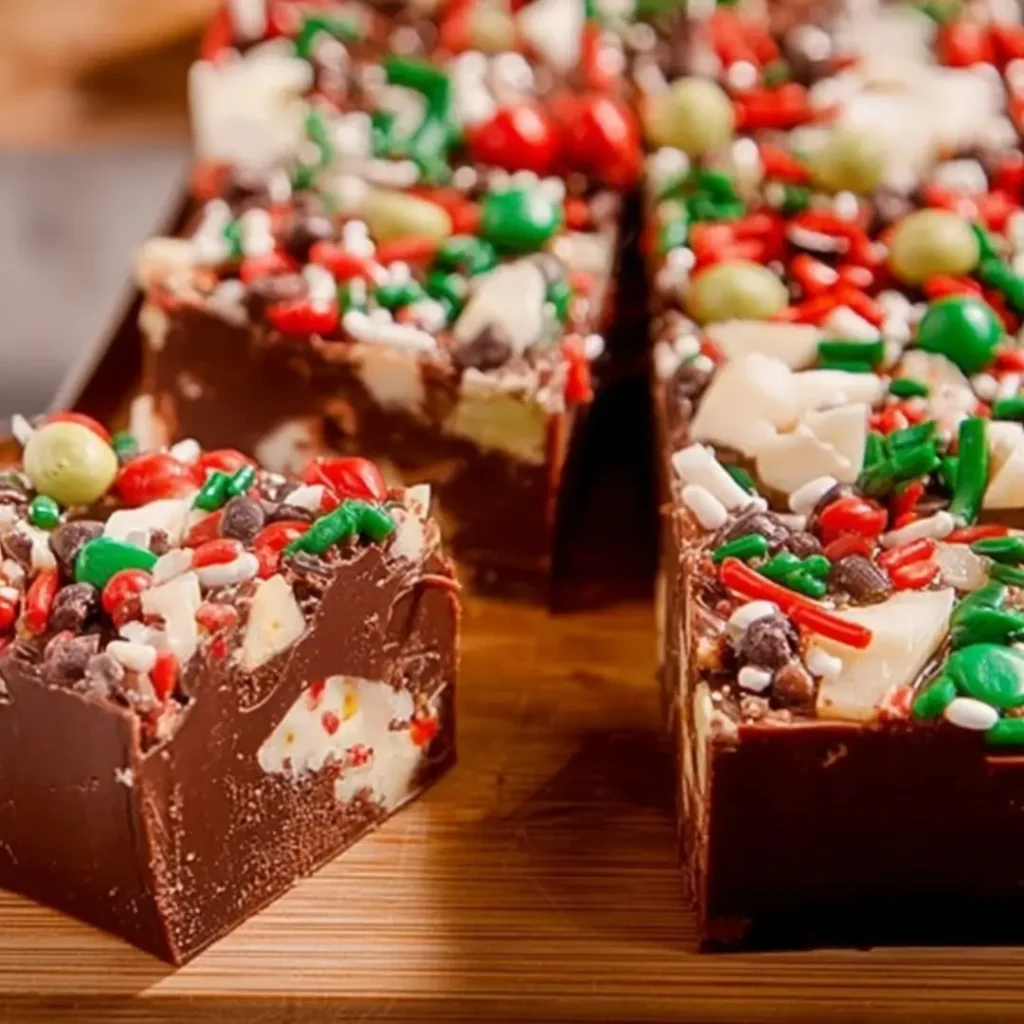
- Red and Green Sprinkles: The festive flair! These are essential for giving your fudge that stunning, holiday-ready look.
- Crushed Candy Canes (Optional): If you love a hint of cool, refreshing peppermint, these add the perfect holiday crunch and flavor contrast.
- Chopped Walnuts or Pecans (Optional): For those who like a textural contrast, nuts add a savory crunch that makes the fudge feel extra decadent.
Note: The exact ingredients and their measurements can be found in the easy-to-print recipe card right under the article!
How to Make the Christmas Fudge
Get ready, friend—this is going to be the fastest path to a delicious holiday treat you’ve ever taken!
Step 1: Prep Your Pan
First things first: we need to get our pan ready. Line an 8×8-inch baking pan with parchment paper or give it a light coat with nonstick cooking spray. I love using parchment paper because it makes lifting the fudge out later a total breeze! Set this aside.
Step 2: Melt the Base
In a medium saucepan (use low heat so nothing scorches!), combine your white chocolate chips and the can of sweetened condensed milk. Now, this step requires a little patience: stir constantly until the mixture is completely melted and beautifully smooth. Once it’s glossy and there are no lumps left, take it right off the heat.
Step 3: Flavor It Up
Remove the pan from the burner and immediately stir in the vanilla extract and that little pinch of salt. Give it a good stir until those flavors are fully incorporated. You can practically smell the holidays now, right?
Step 4: Fold in the Goodies
This is where the magic happens! Gently fold in the mini marshmallows, half of your festive sprinkles, and any nuts you’ve decided to use. Be careful not to over-mix here; we want those marshmallows to stay whole!
Step 5: Press and Decorate
Pour that warm, dreamy mixture into your prepared pan, spreading it evenly with a spatula. Don’t worry about making it perfectly smooth, but get it mostly level. Now, for the grand finale: sprinkle the top with the remaining sprinkles and those beautiful crushed candy canes for the ultimate festive finish.
Step 6: Chill and Cut
Now comes the hard part—waiting! Pop the pan into the refrigerator for a minimum of 2 hours, or until the fudge is perfectly firm and set. Once it’s ready, lift the fudge out using the edges of the parchment paper, and slice it into small, beautiful squares.
Step 7: Store and Enjoy!
You made it! Store any leftovers in an airtight container in the fridge for up to a week. If they last that long!
Pro Tips for Making the Recipe

- Go Low and Slow: When melting the chocolate, always use low heat and stir continuously. White chocolate can seize and burn easily, and we want that gorgeous, smooth texture. If the heat is too high, it will become grainy.
- Use Quality Chips: Since the chocolate is the main star here, using a high-quality white chocolate chip will make a huge difference in the final flavor and texture.
- Wet the Knife: For super clean cuts, run your knife under hot water, dry it quickly, and then slice. Repeat this between cuts! It helps glide right through the dense fudge.
- Make it Peppermint Power: If you’re a big fan of that minty flavor, swap the vanilla extract for a peppermint extract for a truly potent candy cane experience!
How to Serve
This festive fudge is already a showstopper, but here are a few ways to serve or pair it:
- The Treat Platter Star: Arrange the cut squares on your holiday dessert platter alongside sugar cookies, shortbread, and maybe some chocolate truffles. It adds a beautiful pop of color!
- Coffee & Cocoa Pairing: Serve a small square with a mug of your favorite hot cocoa or a strong cup of coffee. The richness of the fudge is perfect with a warm drink.
- The Ice Cream Topper: Crumble a few pieces over a scoop of vanilla bean ice cream for an instant, incredibly decadent dessert.
Make Ahead and Storage
This fudge is a fantastic make-ahead treat, which is perfect for the busy holiday season!
Storing Leftovers
Store any leftover fudge in an airtight container in the refrigerator. It will stay wonderfully fresh and firm for up to one week.
Freezing
You absolutely can freeze this fudge! Once fully set and cut into squares, place them in a single layer in a freezer-safe, airtight container. Separate layers with parchment paper to prevent sticking. Freeze for up to 3 months. Thaw overnight in the refrigerator before serving.
Reheating
No reheating necessary! Fudge is best served straight from the refrigerator, firm and cool.
FAQs
Can I use a different kind of chocolate instead of white chocolate?
Yes, you certainly can! If you prefer a more traditional flavor, you can easily swap the white chocolate chips for the same amount of semi-sweet or milk chocolate chips. The sweetened condensed milk ratio will work perfectly with dark chocolate as well, giving you a beautiful, rich dark chocolate fudge. Keep in mind that the color and flavor will change completely, but the texture will remain the creamy, wonderful fudge we all love!
Why did my fudge turn out grainy or crumbly?
The most common reason for grainy fudge is either using heat that is too high or overheating the mixture once it’s completely melted. Remember to keep the temperature on the stovetop very low and remove the pan the second the mixture is fully smooth. If you cook it for too long or too hot, the sugars can crystallize, which causes that unfortunate grainy texture.
Can I make this fudge ahead of time, and how far in advance?
This recipe is one of my favorites for making ahead! It will easily keep in the refrigerator for up to a week, making it ideal for holiday prep. You can make it an entire weekend before your party, cut it into squares, and store it in an airtight container. If you need it to last longer, you can freeze it for up to 3 months, as noted above.
How do I make the cuts perfectly neat and tidy for gifting?
To get those clean, professional-looking squares, there are two great tricks! First, make sure the fudge is completely chilled and firm before cutting. Second, use a large, sharp chef’s knife. For the neatest edges, run the knife under hot water, wipe it completely dry, and then make a slice. Repeat this hot water/dry wipe technique before each cut.

Christmas Fudge
Ingredients
Equipment
Method
- Line an 8×8 inch baking pan with parchment paper, leaving a bit of overhang for easy removal later.
- In a medium saucepan over low heat, combine the white chocolate chips and sweetened condensed milk. Stir constantly until melted and smooth.
- Remove from heat and stir in vanilla extract and salt until fully combined.
- Fold in half of the M&Ms and sprinkles. Pour the mixture into the prepared pan and smooth the top.
- Sprinkle the remaining M&Ms and sprinkles on top, pressing them gently into the fudge.
- Refrigerate for at least 1–2 hours or until firm. Lift the fudge from the pan using the parchment paper and cut into squares.