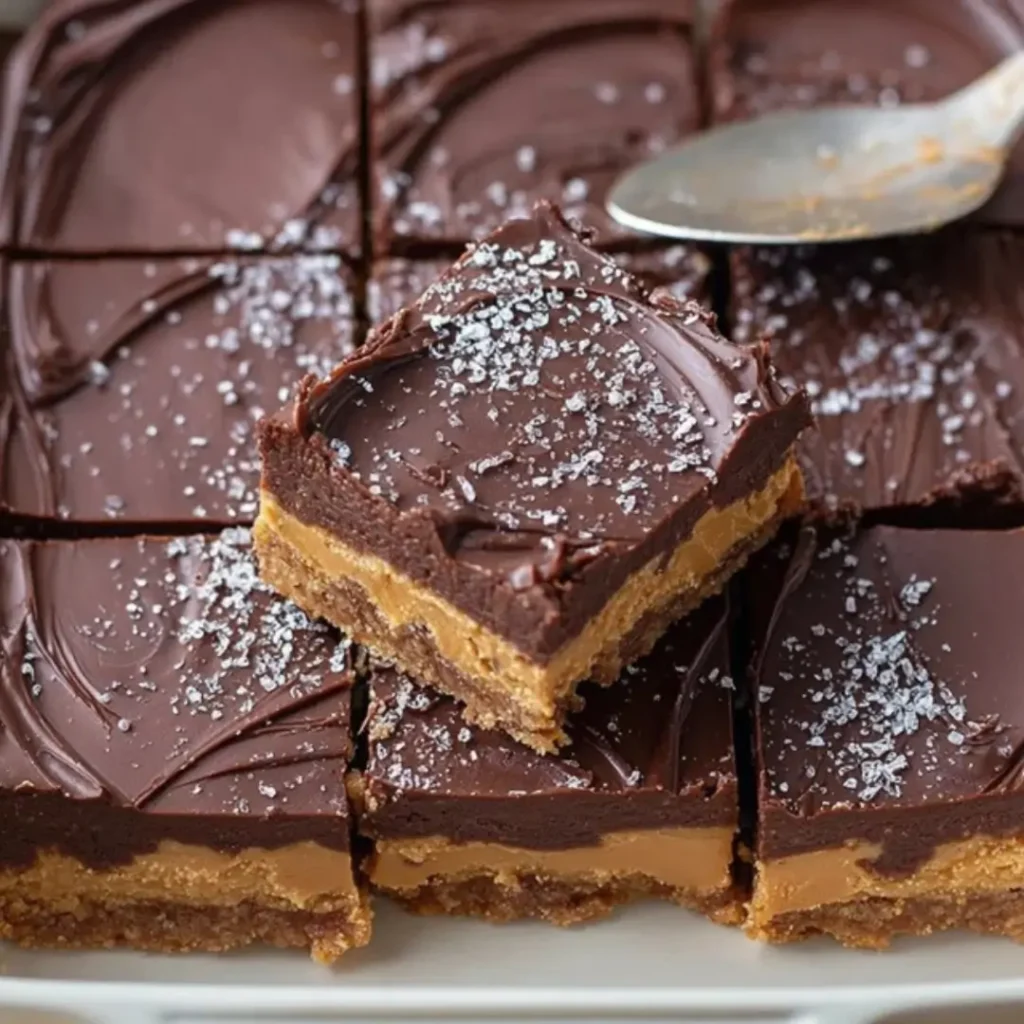
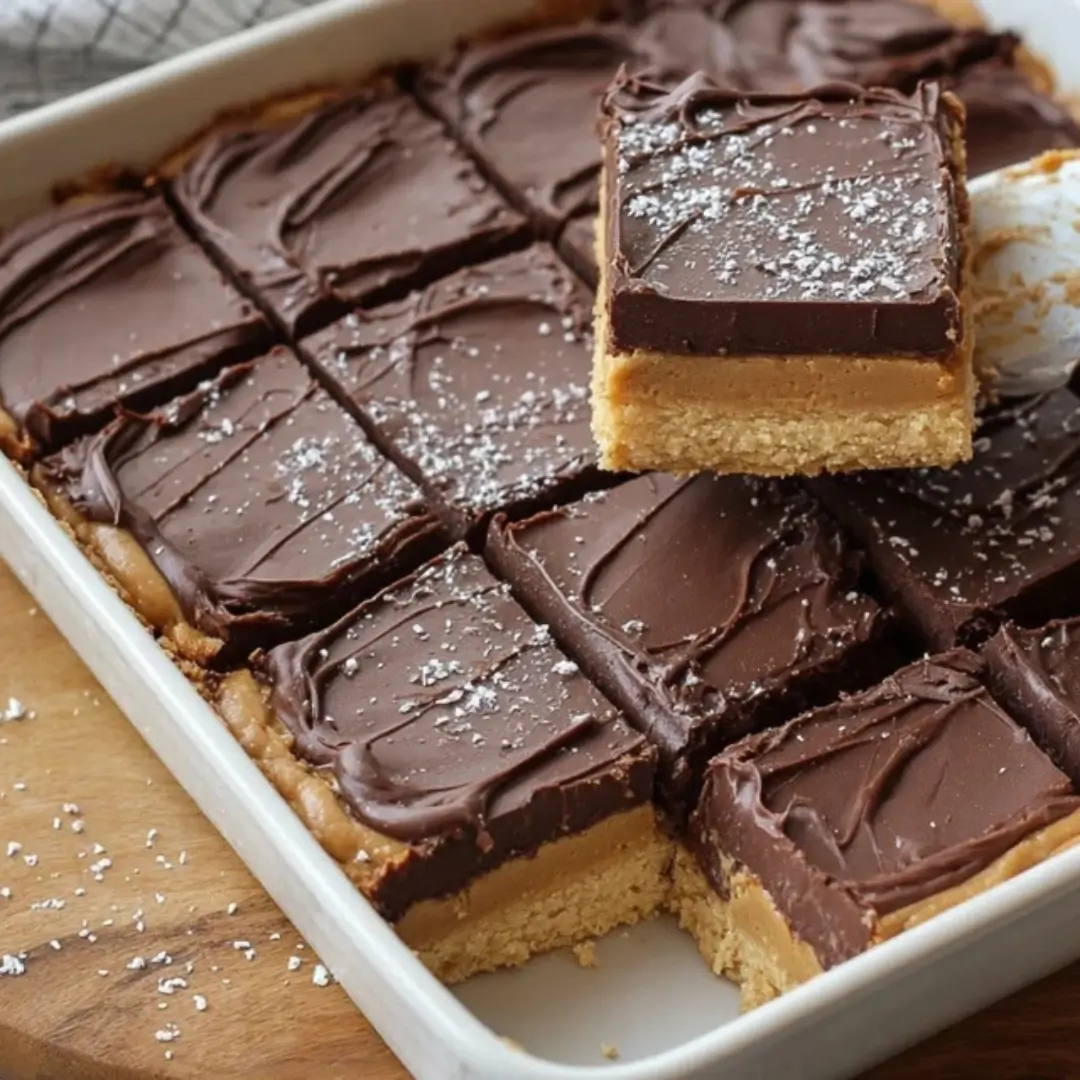
This no-bake masterpiece delivers the ultimate chocolate and peanut butter experience in bar form! With layers of crisp graham cracker crust, a velvety smooth peanut butter filling, and a glossy, rich chocolate topping, this dessert is simple to make but tastes completely luxurious. It’s perfect for parties, quick weeknight cravings, or anytime you need a guaranteed crowd-pleaser that requires almost zero effort.
Why You’ll Love This Recipe
- No-Bake Bliss: Seriously, who wants to turn on the oven when a craving hits? These bars set up perfectly in the fridge, making them ideal for hot weather or minimal-effort dessert making.
- Iconic Flavor Combo: You just can’t beat the pairing of salty, creamy peanut butter and rich, sweet chocolate. It’s a nostalgic match made in dessert heaven!
- Whip It Up Fast: These come together in just about 15 minutes of hands-on time. It’s so quick, you might find yourself making a double batch (I won’t tell!).
- Simple Ingredients: We’re talking pantry staples here! No fancy techniques or hard-to-find items required—just pure, delicious goodness.
Ingredients
All you need for this incredible recipe are a few pantry staples, plus some chilling time! Get ready to gather these goodies:
- Graham Cracker Crumbs: This is the base of our crispy, buttery crust! Using pre-crushed crumbs saves you a ton of time, but you can crush whole crackers yourself in a food processor, too.
- Melted Butter: The essential binding agent that holds the crust together and gives it that rich, irresistible flavor.
- Creamy Peanut Butter: The star of the show! Make sure it’s a creamy variety (not natural/stir-at-the-top, which can make the filling too oily) for the smoothest, most decadent filling.
- Powdered Sugar: This is key for texture, dissolving completely into the peanut butter to make the filling silky smooth without any graininess.
- Vanilla Extract: Just a dash to enhance the sweet, buttery notes and deepen the flavor profile of the peanut butter layer.
- Semi-Sweet Chocolate Chips: Forms the top layer. Semi-sweet is perfect because it balances the sweetness of the filling without being overly bitter.
- Coconut Oil or Butter: This is a crucial little secret! Adding a small amount of fat helps the chocolate melt smoothly and gives the topping a beautiful, glossy shine and a soft “snap” when you bite into it.
Note: The exact measurements and quantities for these ingredients will be provided in the convenient recipe card right below this article!
How to Make the Easy Chocolate Peanut Butter Bars

This is truly the easiest dessert you’ll ever make. You’ll be shocked!
Step 1: Prep the Pan and Crust
Grab an 8×8-inch baking dish and line it with parchment paper. This step is important, trust me! Make sure you leave some overhang so you can use it as a sling later. In a bowl, mix your graham cracker crumbs and melted butter until everything is evenly moistened, like wet sand. Press this mixture firmly into the bottom of the prepared dish to form your crust.
Step 2: Mix the Peanut Butter Filling
In a separate bowl, combine the creamy peanut butter, powdered sugar, and vanilla extract. Stir, stir, stir until the mixture is completely smooth and creamy. It should be thick and easily spreadable.
Step 3: Layer the Filling
Gently spread the luscious peanut butter mixture evenly over the graham cracker crust. Take your time with this part—you want a nice, smooth layer that goes right to the edges.
Step 4: Melt the Chocolate Topping
In a small saucepan over the absolute lowest heat, melt your chocolate chips with the coconut oil or butter. Stir constantly until it’s perfectly smooth and shiny. This step happens fast, so don’t walk away!
Step 5: Pour and Chill
Carefully pour the melted chocolate evenly over the peanut butter layer. Use an offset spatula or the back of a spoon to spread it gently, being careful not to disturb the layer underneath. Now comes the hard part: patience! Refrigerate the dish for at least 2 hours, or until that chocolate topping is perfectly firm and set.
Step 6: Slice and Serve
Use the parchment paper overhang to lift the entire chilled block out of the dish. Slice it into bars (12 is usually a great size) and serve! They are wonderful served chilled or at room temperature.
Pro Tips for Making the Recipe
- Don’t Skimp on the Press: Make sure you press that graham cracker crust down firmly—this prevents crumbling when you cut the bars later. A flat-bottomed measuring cup is great for this job!
- Use the Right Peanut Butter: Avoid natural peanut butter (the kind that separates) as the high oil content can make the filling too soft and prevent it from setting properly. Stick to the classic creamy processed varieties.
- The Glossy Finish: The two tablespoons of coconut oil or butter are essential for getting that beautiful, crack-free, glossy chocolate top. Don’t skip it!
- Clean Cuts: For the neatest, sharpest bars, run your knife under hot water, wipe it clean, and then make a cut. Repeat this process for every slice.
How to Serve
These bars are so delicious, they really don’t need much help, but here are a few fun ways to enjoy them:
- Keep it Simple: Serve them straight out of the fridge with a cold glass of milk. Perfection!
- A Sprinkle Finish: Before the chocolate sets, sprinkle the top with sea salt flakes for an amazing salty-sweet crunch, or a few miniature peanut butter cups.
- Dessert Platter: Cut them into smaller bite-sized squares and arrange them on a platter with brownies and cookies for the ultimate dessert spread.
Make Ahead and Storage
These bars are truly fantastic for making ahead! They need to chill anyway, so planning them a day or two in advance is perfect.
Storing Leftovers
Place leftovers in an airtight container and store them in the refrigerator for up to 1 week. They keep their texture beautifully when chilled.
Freezing
These freeze wonderfully! Once the bars are completely set and cut, place them in a single layer in a freezer-safe container, separating layers with parchment paper. Freeze for up to 3 months.
Reheating
No reheating necessary! Thaw frozen bars overnight in the refrigerator. They are best served straight from the fridge or allowed to sit at room temperature for about 15 minutes before serving for a slightly softer texture.
FAQs
1. Can I use a different size baking dish for these bars?
I highly recommend sticking to the 8×8-inch pan for the best results. If you use a larger dish (like 9×13-inch), your layers will be much thinner, and you may need to increase the ingredient quantities by about 1.5 to 2 times to maintain that perfect, thick layer ratio. A smaller pan will yield thicker bars, which is definitely not a bad thing!
2. Why is my peanut butter filling not setting properly or is too soft?
The most common culprit here is using a natural-style peanut butter where the oil separates. This can introduce too much extra liquid into the mix, making the filling oily or too soft. For this no-bake recipe, stick to a classic, processed creamy peanut butter brand, as the texture is much more reliable for setting with the powdered sugar.
3. What can I use instead of coconut oil in the chocolate topping?
If you don’t have coconut oil, you can absolutely use an equal amount of butter (salted or unsalted works fine) or a flavorless vegetable oil like canola oil. The purpose of this extra fat is just to make the chocolate melt smoothly and prevent it from becoming hard, chalky, or difficult to cut once it sets.
4. How can I make a gluten-free version of these chocolate peanut butter bars?
It’s super easy! The only non-gluten-free item is the graham crackers. Simply substitute the regular graham cracker crumbs with an equal amount of certified gluten-free graham cracker crumbs. All the other ingredients (peanut butter, chocolate chips, butter, etc.) are typically already gluten-free, but always check the label to be safe!
Easy Chocolate Peanut Butter Bars
Ingredients
Equipment
Method
- Line an 8×8-inch baking dish with parchment paper, leaving overhang for easy removal.
- Combine graham cracker crumbs and melted butter until evenly moistened.
- Press mixture firmly into the bottom of the dish to form an even crust.
- Mix peanut butter, powdered sugar, and vanilla extract until smooth and creamy.
- Spread the peanut butter mixture evenly over the crust.
- Melt chocolate chips with coconut oil over low heat, stirring until smooth.
- Pour melted chocolate evenly over peanut butter layer and spread gently.
- Refrigerate for at least 2 hours, or until fully set.
- Lift out using parchment, slice into bars, and serve chilled or room temperature.