Oh, sweet friends, do I have a treat for you today! There’s something truly magical about a samoas pie – that delightful blend of toasted coconut, rich caramel, and a hint of chocolate, all wrapped up in a buttery crust. It’s a symphony of textures and flavors that reminds me of those little cookies we all adore, but transformed into a show-stopping dessert perfect for any occasion.
Growing up, my grandmother always said the best desserts were the ones made with love and a little imagination. I remember countless afternoons by her side, learning to toast coconut until it was perfectly golden, a scent that still brings a smile to my face. This samoas pie is a nod to those cherished memories, a testament to how simple ingredients can create something truly extraordinary.
This recipe is not only incredibly easy to whip up, requiring no oven time for the filling, but it’s also a fantastic make-ahead option, perfect for holiday gatherings or a special weekend treat. My top tip? Don’t rush the chilling process; patience is a baker’s best friend for a perfectly set slice!
What You Need to Make This Recipe
Crafting this delightful dessert relies on simple, essential ingredients. Rich unsalted butter, creamy sweetened condensed milk, and shredded coconut create that signature flavor. These combine for our decadent no-bake samoas pie. My secret? Real vanilla extract adds deep flavor! Full list in the recipe card below.
How to Make samoas pie
Creating this irresistible samoas pie is a joyful journey. We’ll build a sturdy graham cracker crust, then prepare a dreamy caramel coconut filling. Finally, everything chills, followed by a generous chocolate drizzle. Simple steps transform components into a stunning dessert everyone will love!
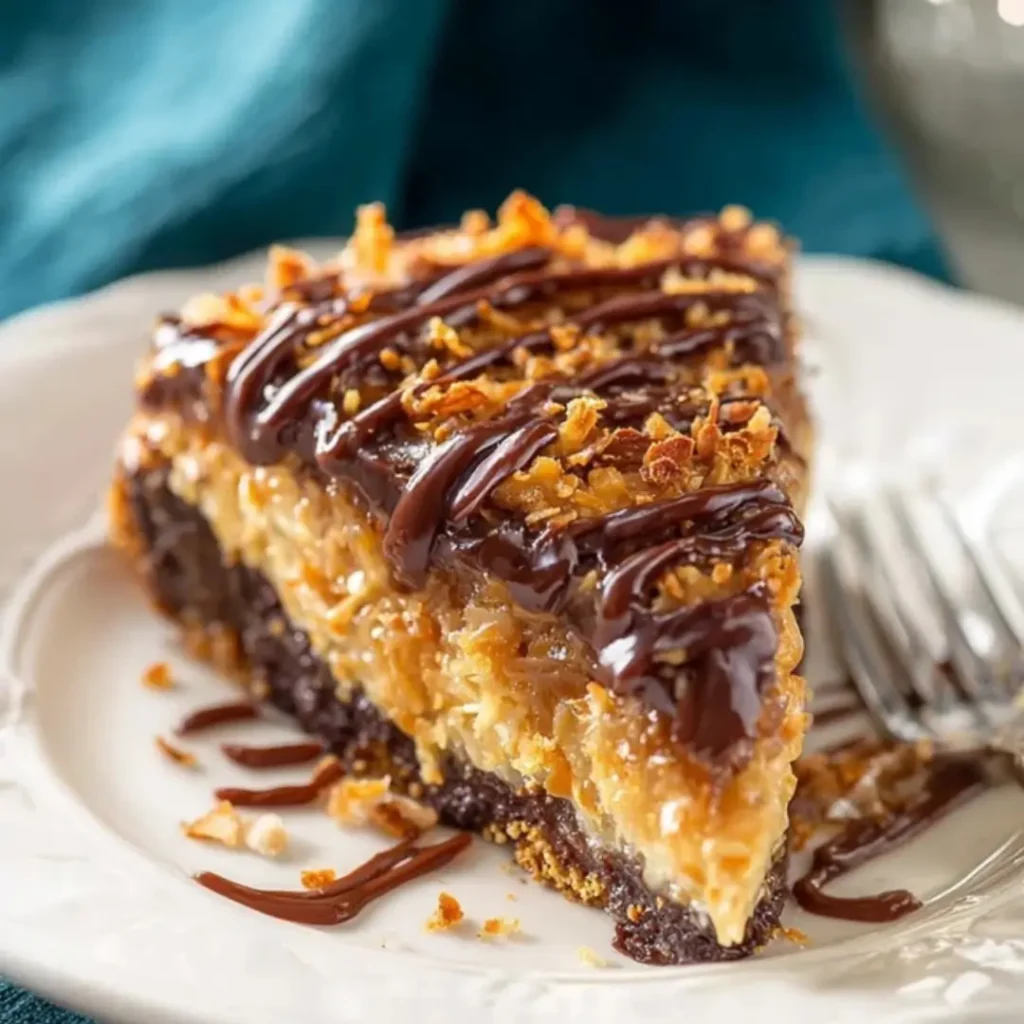
![A close-up slice of {{ $('Fetch Recipe Data').first().json["Main Keyword"] }} with toasted coconut and chocolate drizzle.](https://simplrecipes.com/wp-content/uploads/2026/04/samoas-pie-.webp)
Decadent Samoas Pie
Ingredients
Equipment
Method
- Preheat oven to 350°F (175°C). In a large mixing bowl, combine graham cracker crumbs, granulated sugar, and melted butter. Mix until well combined and the crumbs are moistened.
- Press the mixture firmly into the bottom and up the sides of a 9-inch pie plate. You can use the bottom of a glass or your fingers to create an even crust.
- Bake the crust for 8-10 minutes, or until lightly golden. Remove from oven and let cool completely on a wire rack.
- While the crust cools, spread the shredded coconut in a single layer on a baking sheet. Bake in the preheated 350°F (175°C) oven for 5-7 minutes, stirring once or twice, until golden brown and fragrant. Watch carefully to prevent burning. Remove and let cool.
- In a medium saucepan, melt the butter over medium heat. Add the packed light brown sugar and whisk until smooth. Bring to a gentle boil, stirring constantly, and cook for 1 minute.
- Reduce heat to low, then slowly whisk in the sweetened condensed milk. Continue to cook, stirring frequently, for another 5-7 minutes, until the mixture thickens slightly.
- Remove from heat and stir in the vanilla extract and the toasted coconut. Mix well until the coconut is evenly coated.
- Pour the warm caramel coconut filling into the cooled graham cracker crust. Spread evenly with a spatula.
- Place the pie in the refrigerator and chill for at least 3-4 hours, or until completely set. For best results, chill overnight.
- Once the pie is set, prepare the chocolate drizzle. In a small microwave-safe bowl, combine the semi-sweet chocolate chips and coconut oil (or heavy cream). Microwave in 30-second intervals, stirring after each, until smooth and melted. Alternatively, melt in a double boiler.
- Drizzle the melted chocolate over the chilled pie in a decorative pattern. Let the chocolate set at room temperature for about 15-20 minutes, or briefly in the refrigerator, before slicing and serving.
Notes
Pro Tips for Making This samoas pie
To ensure your samoas pie turns out absolutely perfect, just like the ones I share with my family, I’ve gathered a few of my favorite insights from years of baking. These little nudges can make all the difference, transforming a good dessert into an unforgettable one.
When toasting your coconut, keep a close eye on it! It goes from golden to burnt in a flash. I always toast it in a dry skillet over medium-low heat, stirring constantly, until it’s just fragrant and lightly browned. This step is crucial for that authentic samoas flavor.
My Secret Trick: For the smoothest, most luxurious caramel coconut filling, I always ensure my butter and brown sugar are fully melted and combined before adding the sweetened condensed milk. Whisking it constantly over low heat prevents scorching and creates a wonderfully creamy base for your samoas pie.
Make sure your pie chills completely. I know it’s hard to wait, but allowing the pie to chill for at least 4 hours, or even better, overnight, ensures that the caramel coconut filling sets beautifully. This makes for clean slices and a truly satisfying texture.
When making the chocolate drizzle, I’ve found that a touch of coconut oil helps achieve that perfect, glossy finish that hardens just enough to snap, yet melts delightfully in your mouth. It’s a little trick that truly elevates the presentation and taste of your homemade samoas pie.
Fun Variations for samoas pie
Part of the joy of home baking is making a recipe truly your own! This samoas pie is wonderfully adaptable, and I love encouraging you to get creative. Here are a few ideas to spark your imagination and add your own signature touch to this beloved dessert.
A Touch of Nutty Delight
If you adore nuts, consider adding a sprinkle of finely chopped pecans or walnuts to your graham cracker crust or even folded into the caramel coconut filling. The subtle crunch and earthy flavor can add a delightful dimension, a favorite tweak a friend of mine always requests for her samoas pie.
Dark Chocolate Dreams
While semi-sweet chocolate chips are classic, don’t be afraid to experiment with dark chocolate for your drizzle. The slightly bitter notes beautifully balance the sweetness of the caramel and coconut, creating a more sophisticated version of this no-bake treat.
Salted Caramel Swirl
For those who love a sweet and salty combination, a generous sprinkle of flaky sea salt over the finished chocolate drizzle takes this pie to another level. Or, even better, try swirling in a homemade salted caramel sauce right into the coconut filling for an extra burst of flavor. It’s a simple addition that truly transforms this incredible dessert.
What to Serve With samoas pie
This samoas pie is a showstopper all on its own, but sometimes a little accompaniment can make a delightful dessert even more special. When I’m hosting, I love thinking about how to complement the rich, sweet flavors and creamy textures.
A simple scoop of vanilla bean ice cream is a classic pairing that never disappoints. The cold, creamy ice cream melts slightly into the pie, creating a divine spoonful. It’s a tradition my grandmother always encouraged with her fruit pies, and it works wonderfully here too!
For a lighter touch, a handful of fresh berries, like raspberries or blueberries, provides a beautiful contrast to the sweetness of the samoas pie. Their tartness and freshness are a lovely palate cleanser between bites of caramel and coconut.
And for us adults, a warm cup of coffee or a robust black tea makes for an absolutely perfect end to a meal. The slight bitterness of the beverage cuts through the richness of the pie, making each bite of this delicious pie even more enjoyable. My mom always insists on a strong cup of Earl Grey with any rich dessert!
How to Store Samoas Pie
Once you’ve made this heavenly samoas pie, knowing how to store it properly ensures every slice remains as delicious as the first. This no-bake wonder is a fantastic make-ahead dessert, which makes it even more appealing for gatherings!
Refrigeration Tips
Leftover samoas pie should always be stored in the refrigerator. I recommend covering it loosely with plastic wrap or placing individual slices in an airtight container. This will keep it fresh for up to 3-4 days, maintaining that perfect texture and flavor.
Freezing for Later
Yes, you can absolutely freeze this delightful pie! To freeze the entire samoas pie, wrap it tightly in several layers of plastic wrap, then a layer of aluminum foil. For individual slices, wrap them the same way. It will keep well in the freezer for up to 1 month. My personal tip? Let it thaw in the refrigerator overnight before serving to preserve its creamy texture.
Nutritional Benefits
While this no-bake samoas pie is an indulgent treat, it offers delightful elements. Coconut provides healthy fats and fiber, with the graham cracker crust adding whole grain goodness. It’s a sweet reminder that desserts, enjoyed in moderation, can be both satisfying and nourishing.
FAQs
Faq 1
Absolutely! While a graham cracker crust is traditional for this samoas pie, a shortbread or chocolate cookie crust works too for a richer flavor. Just press it firmly and chill well to ensure a sturdy base for your delicious pie.
Faq 2
Toasting the coconut for your samoas pie is highly recommended! It brings out a deeper, nuttier flavor and aroma, truly enhancing the “samoas” experience. Untoasted coconut is fine, but you’ll miss that signature toasted note.
Faq 3
Yes, with a few substitutions! Use a vegan graham cracker crust, dairy-free butter, and a vegan sweetened condensed milk alternative. Ensure your chocolate chips are also dairy-free to create a delightful vegan samoas pie perfect for everyone.
Faq 4
To prevent cracking on your samoas pie, ensure it’s well-chilled. Allow the melted chocolate to cool slightly before drizzling. The coconut oil in the recipe helps keep it pliable, reducing harsh cracks for a perfect finish.
Conclusion
And there you have it, sweet friends – a recipe for a truly unforgettable samoas pie that brings all the joy of your favorite cookie into a delightful, no-bake dessert! This pie isn’t just about ingredients; it’s about creating moments, sharing laughter around the table, and savoring those simple pleasures that make life so sweet. I hope this recipe inspires you to embrace the joy of baking, knowing that with a little love and patience, you can create magical treats that build lasting memories. Happy baking!